When you run a scan in BullCharts, the scan will produce a table of results we refer to as the “Scan Results Table”. The scan will also produce a new watchlist named “Last Scan Results”, which will replace an earlier version if it exists. In addition, the scan will save a copy of the Scan Results Table as a CSV file into your “Scan Result Export Directory”. This Knowledgebase article explains some of these in more detail.
The Scan Results Table
The Scan Results Table is a list of stocks which met the scan criteria in your scan – if any at all. If the table is empty, then no stocks met your criteria. The “Rejects” tab at the top of the table will show a list of the stocks rejected by the selection criteria.
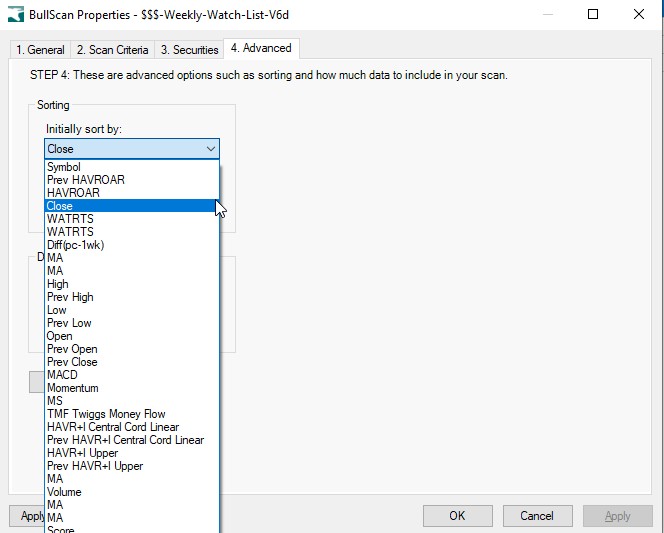
You can sort the contents of the Scan Results Table by clicking on a column heading (to sort the list by that column). Notice that the sequence of results in the table can be controlled with your scan selection criteria. In the Scan Properties dialogue box, click on the tab “4. Advanced” (as shown in the screen shot below), then from the drop-down menu “Initially sort by:”, select one of the listed items (and click on OK to save this).
The Last Scan Results watchlist
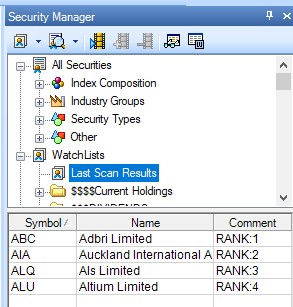
Every time you run a scan, a list of the selected stocks (those that met your criteria) is saved in a watchlist named “Last Scan results”. If this watchlist already existed, then it will be deleted and replaced by the latest version.
This watchlist is like any other, and you can delete it, or rename it to any valid watchlist name so as to keep the results.
This watchlist records one extra value from the scan – the “RANK” of each stock within the scan results table. This is displayed in the watchlist “Comment” field.
The Scan Result Export Directory
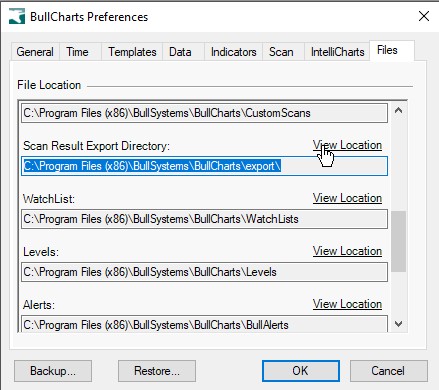
Simply running a BullCharts scan will result in the scan results being automatically saved to your computer as a CSV file (Comma Separated Values). To find the location of this file, use the BullCharts menu option:
File > Preferences > Files (tab).
This will show you the location of the Scan Results, and you can click on the “View Location” option to view that folder in Windows Explorer.
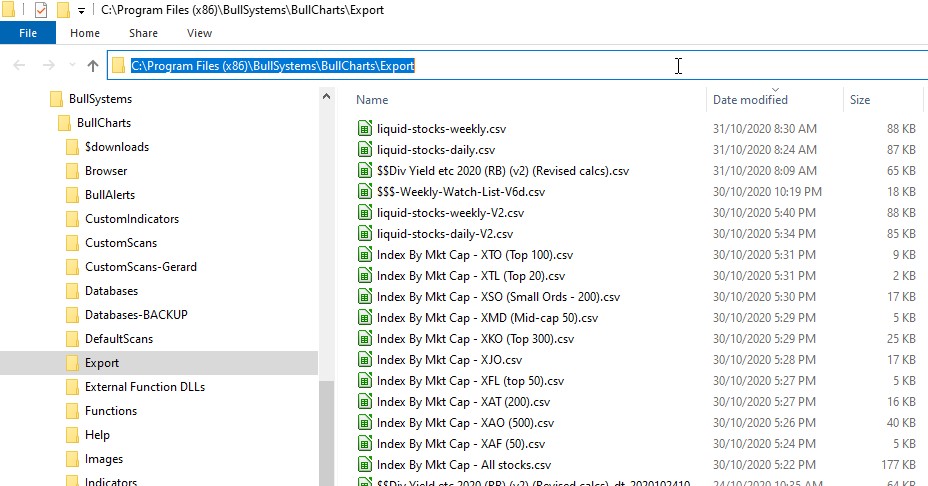
After clicking on the “View Location” link, Windows Explorer will open and show you the contents of that file. An example of this is shown below.
Note the following key points:
- If your view of this folder and its contents is different to the above example, it might be due to your Windows Explorer “View” settings. This example is set to “View > Details”, whereas yours might be set to “View > icons”, or one of the other options.
- This folder will continue to accumulate scan results forever. You might need to occasionally delete old files from this folder as a simple computer housekeeping task.
- This folder is with the other BullCharts folders for: Custom Scans, Custom Indicators, etc.
- The date column will indicate either the creation date, or the “last modified date” for the scan results, which will match the date you ran that scan.
- Once you sort the directory list by “Date modified” (or simply by “Date”), the latest scan results will be at the top of the list. Each file name takes the name of the scan that created it.
- These CSV files can normally be opened using spreadsheet programs such as OpenOffice or LibreOffice Calc or Microsoft Excel. The file is simply a text file, and you can also change the file type from csv to txt, and then open the file using Windows Notepad or any other plain text editing software.
But my Scan Result Export directory is empty!
If you export directory is empty, then perhaps the relevant setting is turned off. You can check this and turn the setting on by using the menu option: Tools > Preferences > Scan (tab).