Overview
BullCharts contains an online Portfolio Manager, to help you keep track of your investments, or any other collection of securities. You can add a simple list of securities and get a summary of their daily performance, or enter the transaction history of your portfolio to get an up-to-date valuation whenever you choose.
The Portfolio Manager contains two kinds of portfolios – the WatchList, and the Share Holding. Each has its own advantages and disadvantages.
- WatchLists hold a simple list of securities, so they can be set up quickly and easily.
- WatchLists can be shared with the Data Email Manager so you can have price updates sent to you regularly.
- WatchLists cannot hold information about how many of any given security you own.
- Share Holdings hold a list of security transactions, so they require a little more effort to set up than WatchLists.
- Share Holdings can give you a list of all the security transactions you’ve made.
- Share Holdings can help you keep track of the total value of your portfolio, and how much profit you’ve made.
Portfolio Basics
Starting the Portfolio Manager
To start the Portfolio Manager, you need to be connected to the Internet. Once you are online, go to the Actions menu, go to the Prices submenu, then choose Portfolios at the bottom:

Portfolio Manager
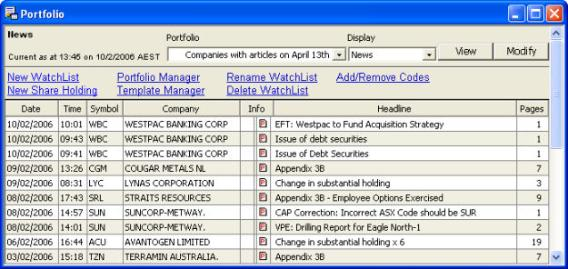
When you first open the Portfolio Manager, you will see the Portfolio Manager:
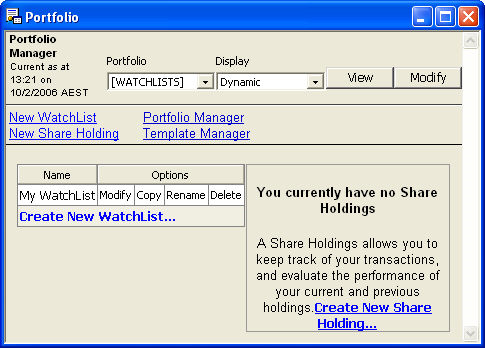
From here you can create a new WatchList, create a new Share Holding, edit a portfolio, duplicate a portfolio, rename a portfolio, delete a portfolio, or examine the details of a portfolio in one of several views. You may also enter the Template Manager.
To create a new WatchList, click the “New WatchList” link. After you type in a name for the new WatchList, you will be taken to the Add/Remove Symbols page.
To create a new Share Holding, click the “New Share Holding” link. After you type in a name for the new Share Holding, you will be taken to the Add/Remove Trades page.
To edit a portfolio, click the “Modify” link next to the portfolio’s name (in the Options column).
To make a new copy of an existing portfolio, click the “Copy” link next to the portfolio’s name (in the Options column).
To rename a portfolio, click the “Rename” link next to the portfolio’s name (in the Options column).
To delete a portfolio, click the “Delete” link next to the portfolio’s name (in the Options column).
To examine the contents of a portfolio, click on the portfolio’s name.
To enter the Template Manager, click the “Template Manager” link.
Portfolio Views
The Portfolio Manager lets you access various views of a portfolio. To choose a view of a portfolio, you need to select the portfolio in the Portfolio list, select the view in the View list, and then click the View button.
There are several views available in the View list:
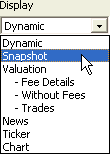
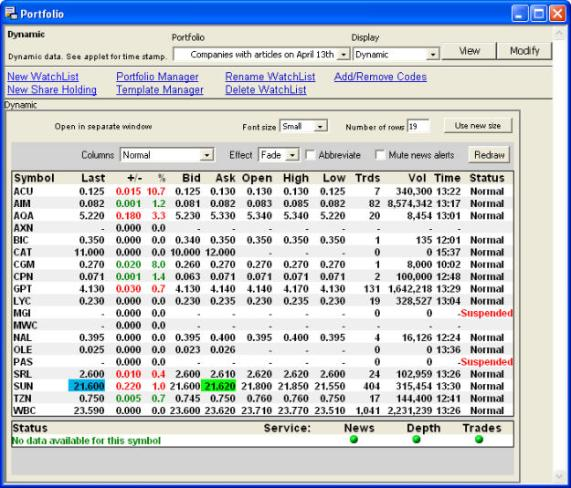
Dynamic displays a dynamically-updated list of all the securities in the portfolio, their current bid and ask prices, and other trading information. This list is updated as trades occur:
Snapshot displays a static list of the securities in the portfolio, their current bid and ask prices, and other trading information. It displays the columns from the most recently applied template. If no template has been applied yet, the standard template is used:
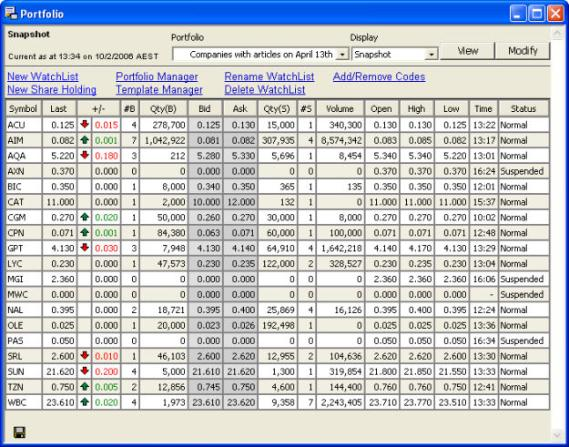
Any templates you have defined in the Template Manager will appear in the view list below “Snapshot”. Choosing any of them as a view will display a snapshot containing the columns from the selected template.
Note the small save icon at the bottom of the report. Clicking on this icon will allow you to download a copy of the snapshot view in CSV format, suitable for loading into spreadsheet software such as Microsoft Excel.
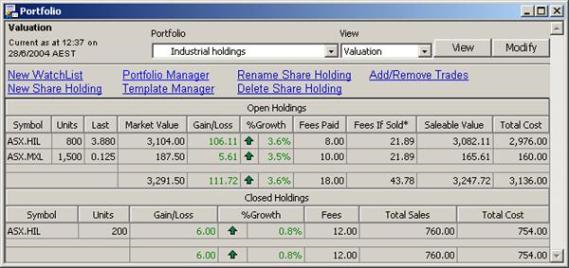
Valuation can only be used with Share Holdings, not WatchLists. It displays a list of Open Holdings (securities for which you have not yet sold all the shares you own) and Closed Holdings (securities for which you have sold all the shares you own). For Open Holdings, it tells you how much your stock is currently worth, while for Closed Holdings it tells you how much the value of your stock changed while you held it. Note: the “Fees Paid” column is based on information you supplied when you set up your Share Holding, while the “Fees If Sold” column is based on typical brokerage fees. For specific details of the fees you would be charged to sell your stock, see your stockbroker.
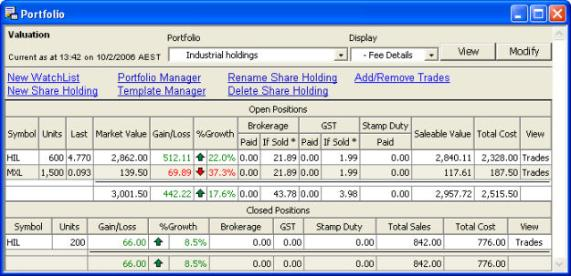
Fee Details can only be used with Share Holdings, not WatchLists. It resembles Valuation, but includes brokerage fees, GST, and stamp duty as separate columns. Note: The “Paid” columns for each fee type are based on information you supplied when you set up your Share Holding, while the “Fees If Sold” column is based on typical brokerage fees. For specific details of the fees you would be charged to sell your stock, see your stockbroker.
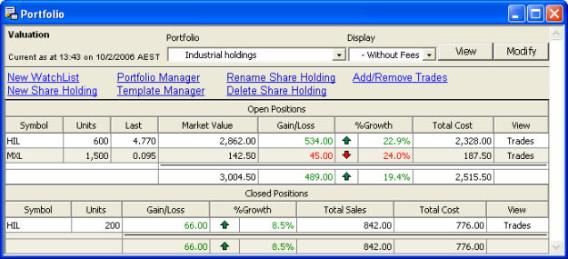
Without Fees can only be used with Share Holdings, not WatchLists. It resembles Valuation, but without any fee information at all. This is useful if you omitted to enter fee information when you set up your Share Holding, or if you can trade securities without being charged a brokerage fee.
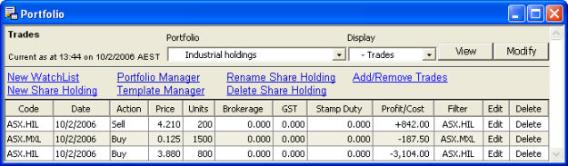
Trades can only be used with Share Holdings, not WatchLists. It gives you a detailed list of every transaction you have entered into this Share Holding, as well as the profit or cost of each transaction. You can also edit individual trades, or delete them entirely.
News displays a list of recent ASX Company Announcements issued by any of the companies in this portfolio.
Ticker can only be used with WatchLists, not Share Holdings. It opens a new window that contains a tile for every stock in the WatchList. Each tile contains the stock symbol, the current price, the stock’s movement since the previous market close, and various other status indicators. Each tile’s background briefly glows when the current price changes – a green glow for an increase, or a red glow for a decrease. For more details about the ticker and alarm systems, see the Portfolio Tickers section below.
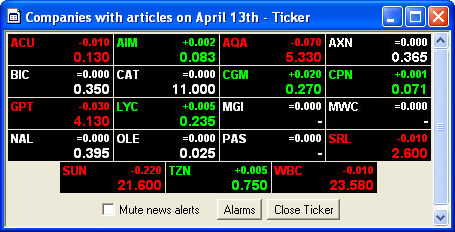
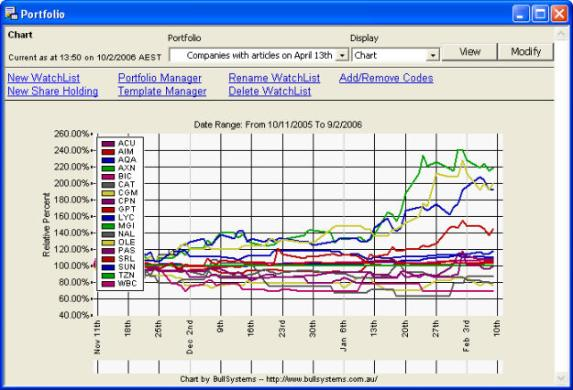
Chart displays a single, simple chart of the prices of all the securities in the portfolio, plotted against a relative-percent axis.
Portfolio Editing
Add/Remove Symbols
This page will appear whenever you have just added, or when you attempt to modify or edit a WatchList:

To add securities to the WatchList, use the Add Securities pane:
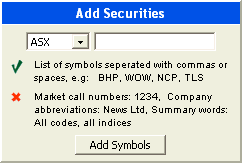
- Make sure the correct exchange appears in the exchange drop-down list.
- Type the symbol associated with the first security, then a space, then the symbol associated with the next security, then a space, and so forth.
- Click the “Add Symbols” button.
- When the page refreshes, the symbols you added should appear in the Remove Securities pane in case you want to remove them again.
If you don’t know the symbol associated with the security you wish to add, you can search for a symbol by choosing Symbol Search at the bottom of the Actions menu.
To remove securities from the WatchList, use the Remove Securities pane:
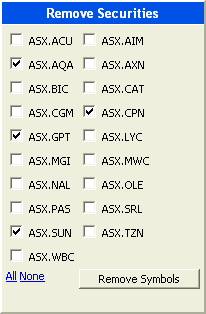
- Each box is labelled with a symbol, and the exchange which contains that symbol.
- Tick the box of each security you wish to remove from the WatchList, to select that security.
- Click on the “Remove Symbols” button.
- When the page refreshes, the symbols you ticked should have disappeared from the Remove Securities pane.
If you don’t know what security a particular symbol represents, you can use the Symbol Search tool in the Actions menu.
Add/Remove Trades
This page will appear whenever you have just added, or when you attempt to modify or edit a Share Holding:
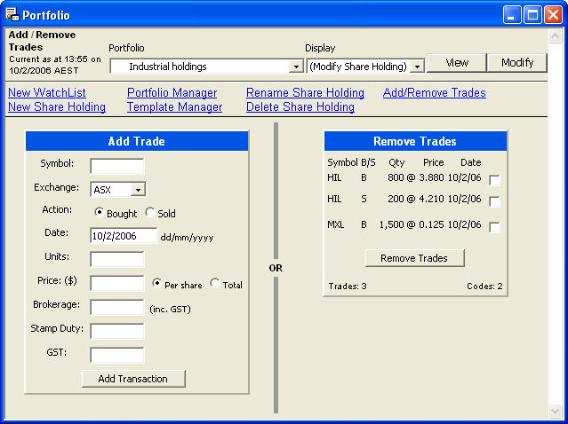
To add a trade to the Share Holding, use the Add Trade pane:
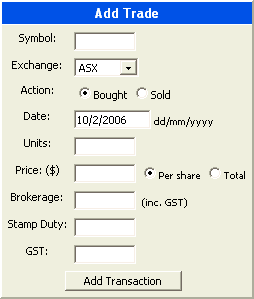
Symbol is the trading symbol for the security you have traded. If you do not know what the symbol for a security is, you can use the Symbol Search feature at the bottom of the Actions menu.
Exchange is the stock exchange the security is listed on.
Action must be either Bought (if you purchased some stock) or Sold (if you sold some stock you already owned).
Date is the date on which this transaction was made. You may use this feature to back-date transactions, but if you enter a date in the future, you will not get sensible results.
Units is the number of shares involved in the transaction.
Price is the amount in dollars that you paid (if you bought) or that you received (if you sold) for the shares or other securities you traded. If you select “Per share”, the amount will be multiplied by the number in “Units” above to find the total price, but if you select “Total”, the amount will not be altered.
Brokerage is the total number of broker’s fees you paid to complete the transaction. This value should include the 10% GST.
Stamp Duty is the amount of stamp duty you paid on the transaction, if stamp duty was still in effect when this transaction took place. Stamp duty was 1.5% of the transaction value.
GST is the amount of money you paid on the transaction, if GST was in effect when this transaction took place.
If you do not know the details of the various fees associated with a transaction, you can leave them blank. However, the Valuation and Fee Details reports will not be accurate.
When you have finished entering the details of your trade, click the “Add Trade” button. When the page refreshes, the trades you added should have appeared in the Remove Trades pane, in case you want to remove them again.
To remove a trade from the Share Holding, use the Remove Trades pane:
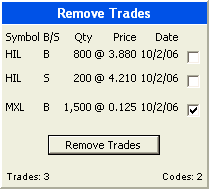
Tick the box next to the trade you wish to remove from the Share Holding
Click the Remove Trades button.
When the page refreshes, the trades you ticked should have disappeared from the Remove Trades pane.
Editing Trades
From the Trades view of a Share Holding (see Portfolio Views under Portfolio Basics, above) you may edit an individual trade by clicking the Edit link in the Edit column near the right-hand side of the table. This will take you to the Edit Trades pane:

All the settings in this pane are identical in function to the Add Trades pane, so see “Add/Remove Trades” above for details.
When your modifications are complete, click the “Modify Holding” button, and you will be returned to the Valuation View.
Portfolio Templates
The Template Manager allows you to customise the display of portfolio information, so you can see the information you need at a glance. You can choose from over 30 different columns and view the results on screen or save them to a file for later use.
Template Manager
To open the Template Manager, click the “Template Manager” link near the top of the Portfolio Manager.
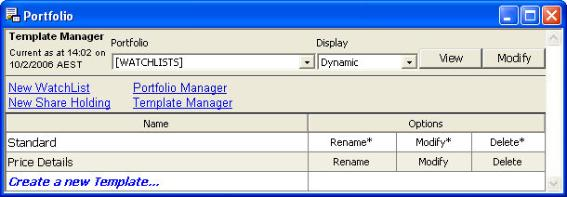
From the Template manager, you can create a new template, delete an old template, rename an existing template, or modify an existing template.
To create a new template, click the “Create a new Template…” link at the bottom of the template table.
To delete an old template, click the “Delete” link on the right.
To rename an existing template, click the “Rename” link next to the template’s name.
To modify an existing template, click the “Modify” link next to the template’s name.
Note 1: If you reached the Template Manager from a page that was displaying a particular portfolio, there will be an extra link available after the Delete link. This allows you to see which template is currently Applied, and to Apply a different template. When a template is Applied, that means it will be used when you select Snapshot in the View list, No matter which template is applied, you can always view a Portfolio Snapshot via a specific template, by choosing that template name from the View menu directly.
Note 2: The Standard template is a special template. It can be Applied, but it cannot be renamed, modified, or deleted.
Modify Template
When you click the “Modify” link in the Template Manager, you will be taken to the Modify Template Page:
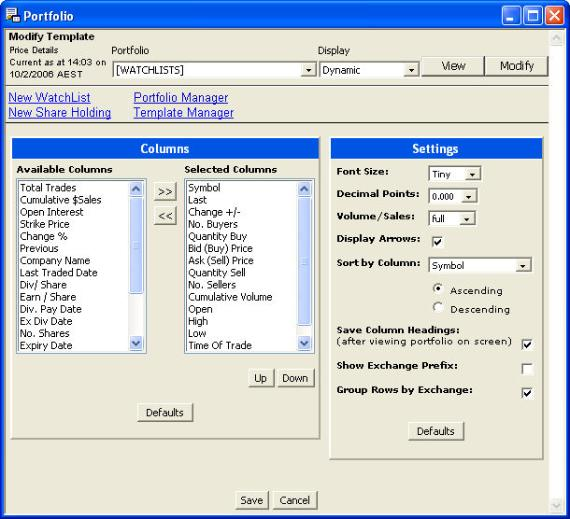
When you have finished editing the Template settings (described below), you can either save your settings by clicking the “Save” button at the bottom of the page, or undo all your changes by clicking the “Cancel” button. Neither button will return you to the Profile Manager or the Template Manager – once you have saved your work or cancelled it, you can click on the “Portfolio Manager” or “Template Manager” links near the top of the page.
There are two main parts of the Modify Template page: the Columns pane and the Settings pane.
The Columns pane allows you to choose which columns you want in the resulting template and what order you want them to be in:
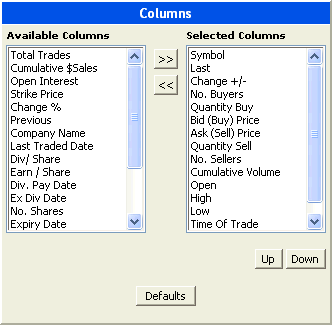
To add a column to the template, click on it in the “Available Columns” list, then click the “>>” button to move it to the “Selected Columns” list.
To remove a column from the template, click on it in the “Selected Columns” list, and then click the “<<” button to move it to the “Available Columns” list.
To change the order of columns in the template, click on a column in the “Selected Columns” list, then click the “Up” or “Down” buttons to move it into place. Repeat for any other columns that are out of position. If you select more than one name in the list and then click “Up” or “Down”, the selected columns will all be moved at once.
To reset the list of columns to the default list (as seen in the Standard template), click the Defaults button.
The Settings pane allows you to change various formatting and sorting options for the template:
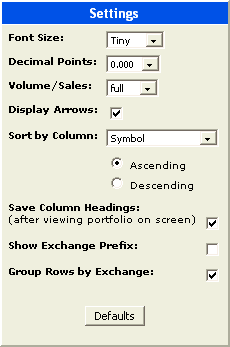
Font Size determines the size of the text in the resulting Snapshot table, from Normal to Tiny. If you have a small screen or you want to add lots of columns, you might want to use a smaller font to prevent text from wrapping, or forcing you to scroll horizontally to see all the data.
Decimal Points determines the precision of prices and other small numeric values. If you want more precision, choose a larger number of decimal points. If you have a small screen or you want to add lots of columns, choose a smaller number.
Volume/Sales determine the precision of the Cumulative Volume and Cumulative Sales columns. “Full” shows the precise number, “100’s” shows the number divided by 100, and “1000’s” shows the number divided by 1000. If you want the most precision, choose “Full”. If you have a small screen or you want to add lots of columns, choose “100’s” or “1000’s”.
Display Arrows determines whether arrows will be displayed in the “Change +/-” and “Change %” columns. If you want to have movement summarised at a glance, tick this box. If you have a small screen or you want to add lots of columns, you might want to untick it.
Sort by Column determines how the resulting table of securities will be sorted. You may choose from any column in the “Selected Columns” list. Note: If you have added or removed columns since you entered the Template Manager page, the “Sort by Column” list may not reflect the current list of columns. Either save your changes by clicking the “Save” button at the bottom of the page, or revert your changes by clicking the “Cancel” button. Then the “Sort by Column” list should be updated.
You can change the sort order by clicking the “Ascending” or “Descending” buttons below the “Sort by Column” list.
Save Column Headings affects the behaviour of the snapshot saving feature (the small save icon at the bottom of the Snapshot view). When this option is checked, the file that is saved will include a row of headings before the data rows, otherwise the data will be unlabelled. Some software may require the headings to be present, some might require them to be absent, and some software (such as Microsoft Excel) might accept either. Check with the documentation of the software in question for more details.
Show Exchange Prefix controls whether the Symbol field includes exchange information. If your portfolios frequently contain symbols from multiple exchanges (say, Australian and US companies) and you want to be sure which exchange each symbol belongs to, tick this box. If you have a small screen, you want to add lots of columns, or your portfolios usually contain symbols from only one exchange, untick this box.
Group Rows by Exchange causes all the securities in the portfolio to be grouped according to their parent exchange after they are sorted, so the resulting table has all the securities from the first exchange (sorted by the Sort by Column), then all the securities from the next exchange (also sorted by the Sort by Column) and so forth.
Defaults causes all the settings to be reset to the defaults (as seen in the Standard template).