TradeSim Introduction
Quick Guide to TradeSim
- Read below for a TradeSim overview.
- Read below to learn about obtaining TradeSim.
- See the Installation guide for installing the TradeSim plug-in.
- See the Walk Through for running a sample TradeSim scan.
- Learn about creating your TradeSim Scans and systems.
What is TradeSim
TradeSim is an advanced trading simulator and back tester developed by Compuvision. System testing is an important activity for every technical trader. After developing a trading system, one must determine if the system is going to be profitable. TradeSim, combined with BullCharts, provides this analysis by simulating your strategy over historical data.
BullCharts integrates with TradeSim by allowing you to describe your trading system using the BullCharts criteria builder without requiring any programming at all! The BullCharts security mananger also allows you to control which market sectors your simulation should be performed on. Or if additional flexibility is required, you can describe your trading system using the BullScript scripting language.
Obtaining TradeSim
TradeSim is a third-party program that can run with BullCharts. Contact BullSystems for information on how to purchase TradeSim.
If you have not purchased TradeSim, you can still explore the TradeSim system editor that is built into BullCharts. This will help give you an idea of how easy it is to set up a trading system.
TradeSim Samples
The following screen captures illustrate the types of reports that TradeSim can produce. Refer to the TradeSim manual for more details on performing analysis.
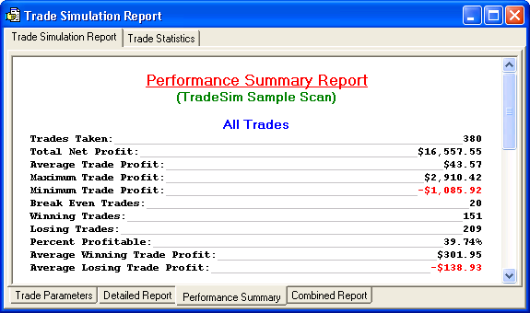
Sample simulation summary report for a MACD trading system
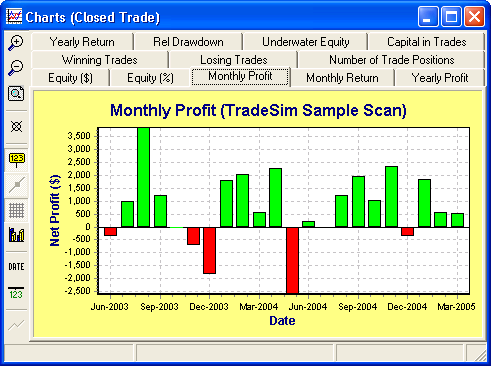
Sample monthly profit chart for MACD system
TradeSim Walk-Through
The following walk-through will take you through opening and running the sample TradeSim Scan. Running this scan will build a trade database that can be analysed in TradeSim.
Before We Start
- First, install TradeSim and the plug-in DLL if you haven’t already.
- This walk-through will look at the sample MACD trade system that comes with BullCharts.
Running the sample MACD system
- Start the BullCharts program.
- Press F8 to open the scan manager.
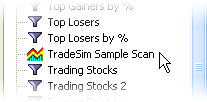
- Locate the TradeSim Sample Scan.
- Double click on it to view its properties.
- You can see the Trade System set up.
- Click the Apply And Run button.
- The scan will start to process. This will take a couple of minutes.
- The resulting report will show the number of potential trades found for each security.
Analysing the results in TradeSim
- Start the TradeSim program from your start menu.
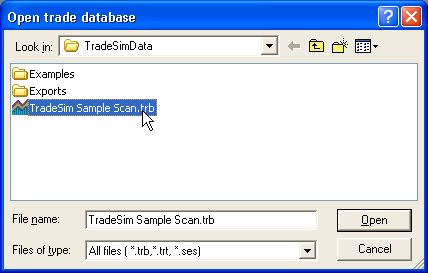
- Select Open Trade Database from the File menu.
- Select the TradeSim Sample Scan file.
- Several windows will open, described in detail in the TradeSim manual.
- Click the Start Simulation button.

- Several results windows will appear, including the simulation summary report and various charts.
- Check your TradeSim manual to learn more about the various analysis tools that are available in TradeSim.
TradeSim Plug-In Installation
If you already have Metastock installed
The TradeSim installer behaves slightly differently if Metastock is already installed on your computer. If you already have Metastock installed, and have not yet installed TradeSim, then install TradeSim according to the instruction provided with TradeSim. Once TradeSim is installed proceed to the section below titled “If you have already installed TradeSim”.
If you experience problems installing TradeSim for BullCharts, refer to the Troubleshooting section at the end of this article.
If you have already installed the TradeSim program
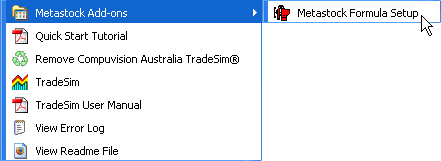
- Click on the Start menu, then All Programs, and locate the TradeSim program folder.
- Select Metastock Formula Setup in the Metastock Add-ons folder.
- A window should appear asking you to locate the FormOrg.exe program. If it does not, then refer to the Troubleshooting section at the end of this article.
- Navigate to: C:\Program Files\BullSystems\BullCharts\

- Select the FormOrg.exe program and click OK.
- Read the copyright notice and press Accept.
- You will see a message indicating that the TradeSim dll was installed. Click OK.
- Restart BullCharts
If you have not already installed the TradeSim program
- Follow the TradeSim installation instructions.
- During installation, a window should appear asking you to locate the FormOrg.exe program. If it does not, then refer to the Troubleshooting section at the end of this article.
- Navigate to: C:\Program Files\BullSystems\BullCharts\

- Select the FormOrg.exe program and click OK.
- Read the copyright notice and press Accept.
- You will see a message indicating that the TradeSim dll was installed. Click OK.
- Continue with the installation.
- Restart BullCharts.
Troubleshooting
If you have Metastock already installed and are experiencing problems installing the plug-in for BullCharts, (for example, if the “locate FormOrg” window does not appear) then follow these steps:
- Open windows explorer.
- Browse to: C:\Program Files\Equis\MetaStock\External Function DLLs\
- Right click on TradeSim.dll and select copy
If you do not see TradeSim.dll then TradeSim has not been set up in Metastock yet either. - Paste the file into: C:\Program Files\BullSystems\BullCharts\External Function DLLs\
- Restart BullCharts. You’re now ready to use TradeSim.
Creating TradeSim Scans
What is a TradeSim Scan
A TradeSim Scan is a BullScan that is specially designed to generate trade data for the TradeSim database. Refer to the TradeSim Quick Start Tutorial for more information about how this process works. TradeSim scans are shown with the  TradeSim icon.
A TradeSim scan consists of multiple trade systems. Each trade system describes the conditions for entry and exit. A system can either be a long system or a short system. Each trade system represents a call to the RecordTrades formula as described in the TradeSim manual.
Creating a new TradeSim Scan
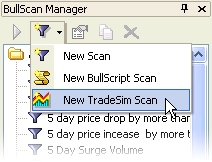
Step 1: Press F8 to open the scan manager if it’s not already open.
Step 2: Click on the triangle next to the New Scan button
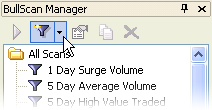
Step 3: Select New TradeSim Scan
Step 4: The TradeSim Scan editor (pictured below) will appear. Enter a name for your scan.
Editing the TradeSim Scan
Select the Trade Systems tab to describe your trading system. See the trade systems help topic for details.
The General, Securities, and Advanced tabs all work the same as for a normal BullScan. Refer to the BullScan help notes for more details about the settings on these tabs.
Press Apply or OK to save changes to your scan.

TradeSim scan editor
Trade Systems
What is a Trade System
A Trade System is a set of rules for entering and exiting a trade. A trade system can describe either long trades or short trades. Each TradeSim Scan can have one or more trade systems.
A trade system consists of:
- A short description of the system
- Rules for entering a trade
- Rules for exiting a trade
- Various stops
- Settings that control how TradeSim analyses the trades.
Tip: Each trade system represents a call to the RecordTrades function as described in the TradeSim manual. You can use the Generate Scan BullScript button located on the Advanced tab to see the TradeSim functions being called.
Creating and Managing Trade Systems
The Trade Systems tab of the TradeSim scan editor is used to create or manage individual trade systems in your scan. The data settings at the top of the window are the same as for normal BullScans. Refer to the BullScan help for more details.

Trade Systems tab
- Trade System Buttons
New Creates a new trade system.
Edit Edits the selected trade system. You must have a trade system selected.
Copy Copies the selected trade system(s) to the clipboard. These can be copied to the same scan, or a different scan.
Paste Pastes trade systems from the clipboard.
Delete Deletes the selected trade system(s)
When New or Edit is clicked, the trade system properties window is displayed.
- Enabling and Disabling Trade Systems
The tick box to the left of each trade system indicates if that trade system is enabled. If a trade system is disabled then it will not be included when the TradeSim scan is next run, and its trades will not be included in the TradeSim trade database.
- Renaming a Trade System
The description of a trade system can be changed by any of the following methods:
-
- Select the trade system and press F2. Type a new description and press enter.
- Right click on the trade system and select Rename.
- Select the trade system. Pause a second. Click it again.
- Open the properties for the trade system and change its name on the General tab.
Trade System Properties
Use the Trade System Properties page to edit the following:
-
Entry Tab
- Conditions for entering a trade
- Price that simulated trade should be entered at
- Trade Pyramiding settings
-
Exit Tab
- Conditions for exiting a trade
- Price that simulated trade should be exited at
- Time restrictions on exits (including time stop)
-
Stops Tab
- Calculation for Initial Stop (used for risk management)
- Protective stop settings (based on the initial stop)
- Profit stop settings
-
General Tab
- Trade system description
- Trade type (long or short)
- Settings for other TradeSim features

Trade System Properties
Note: To access the trade systems properties page, select New or Edit from the Trade Systems tab of the TradeSim Scan window.
Trade System Entry Properties
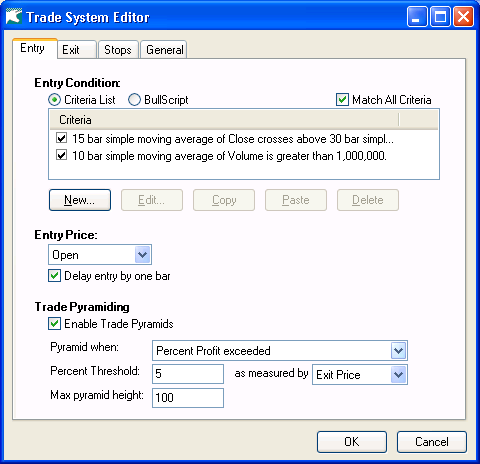
Trade system entry properties
Entry Condition
Use entry condition section to describe the conditions required to enter a trade. You may describe your entry conditions as either a list of criteria, or by using some BullScript.
Criteria List
The Criteria List method allows you to easily build rules such as enter when close crosses above 14 day moving average.. Select the Criteria List radio button to use the criteria method (selected by default). Press the New button to add new criteria. The criteria list editor is similar to the criteria list editor used for normal BullScans. Refer to the criteria help notes for a detailed discussion of using the criteria editor.
Use the Match All checkbox to specify that every criteria is needed to make the trade, or uncheck it to specify that only any one criteria is required. The Entry Condition requires at least one criteria.
BullScript Conditions
More advanced entry rules can be created by using BullScript. Select the BullScript radio button to use this method. If your BullScript returns a true value then a trade will be entered.
The following restrictions apply to BullScript in this context:
- Your script must return exactly one result. (However you can still use variables as per normal).
- The result will be interpreted as a true/false result.
- Your script may not ask for any inputs.
- Attributes have no effect.
Example Script
a :=

ma(Close,10,Simple);

b := ma(Close,60,Simple);

cross(a,b) And Volume >

1000000
Entry Price
This specifies the price that your simulated trade would enter at (for days where the entry conditions are satisfied). Select one of the options from the dropdown.
Select BullScript from the dropdown to enter at a calculated price. For example, if you wanted to enter at the typical price. When entering BullScript, the following restrictions apply:
- Your script must return exactly one result. (However you can still use variables as per normal).
- The result will be interpreted as a price.
- The result must be in the range of the high and low price (inclusive) so only realistic trades can be specified.
- Your script may not ask for any inputs.
- Attributes have no effect.
Delay entry by one bar
TradeSim recognises that trade decision often can not be acted upon until the following day. Tick this option to simulate this scenario. Typically you would use this in conjunction with using Open as the entry price.
Advanced: This is equivalent to calling the EnableDelayOfEntryByOneBar function as described in the TradeSim manual.
Trade Pyramiding
By default, TradeSim will not open a new position in a security if a position is already held for the same security by the same trading system. Select Trade Pyramiding to allow multiple entries.
The Trade Pyramiding options are dicussed in detail in the TradeSim manual.
Advanced: Most of the Trade Pyramiding options are equivalent to calling the EnableTradePyramiding function. The as measured byoption is equivalent to calling the SetPyramidProfitThresholdDetection function. Refer to the TradeSim manual for details.
Trade System Exit Properties

Trade system exit properties
Exit Condition
Use entry condition section to describe the conditions required to exit a trade. This does not need to include stops. This works similar to the entry condition. See the Entry topic for details.
Note: The above illustration shows the BullScript option selected instead of the criteria list option. Both options are available to entry and exit.
Exit Price
This specifies the price that your simulated trade would exit at (for days where the exit conditions are satisfied). This works similar to the entry price, except for the delay by one bar option. See the Entry topic for more details.
- Delay exit by one bar
This is equivalent to calling the EnableDelayOfAllExitsByOneBar function. See the TradeSim manual for notes about the effects of this function.
Exit Settings
- Ignore exits for N bars
Ignores the exit condition if it is triggered within the specified number of bars. This is equivalent to calling the SetExitTriggerDelay function as described in the TradeSim manual.
- Force exit after N bars
This option provides a time stop and will force positions to close after a specified number of bars. This is equivalent to calling the SetTimeStop function as described in the TradeSim manual.
Trade System Stops Properties
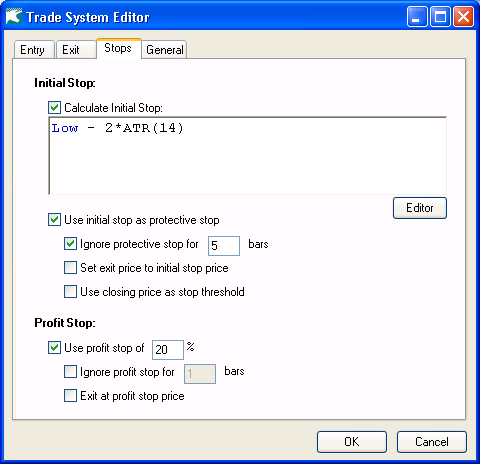
Trade system stops properties
The options on this page cause various TradeSim functions to be activated. The functions called are listed so that you can refer to them in the TradeSim manual for more detail.
Initial/Protective Stop
Calculating an Initial Stop
Calculate Initial Stop Select this option to calculate an initial stop. TradeSim can use your initial stop for applying various position sizing models. There are many different initial stops in use, however the more popular ones tend to be based on volatility.
There are some restrictions on BullScript when specifying an initial stop:
- Your script must return exactly one result. (However you can still use variables as per normal).
- The result will be interpreted as a price.
- The price must be below the entry price for long trades, and above the entry price for short trades.
- Your script may not ask for any inputs.
- Attributes have no effect.
Example Script
arc :=

3;

period := 10;

Close-arc*ATR(period);
Your initial stop calculation will be used as the 6th parameter to the RecordTrades function discussed in the TradeSim manual. If you do not specify an initial stop then zero will be used.
Using the Initial Stop as a Protective Stop
Use Initial Stop as Protective Stop If this option is not ticked then the trade won’t exit after passing the initial stop. Untick this option if you only want to use the Initial Stop for position sizing. If this option is ticked then the trade will exit after passing the initial stop.
Ignore protective stops for N bars If checked then the protective stop will not apply within the specified number of bars of entering the trade. This option works with the previous option to use the EnableProtectiveStop function.
Set exit price to initial stop price This will cause a stopped out trade to exit at the initial stop price. If it is not set then the trade will exit at the exit price, specified on the Exit tab. Equivalent to the SetExitPriceToInitialStop function.
Use closing price as stop threshold This will cause the closing price to be compared to the initial stop instead of the normal method of using the open and range. Equivalent to the UseClosingPriceAsStopThreshold function.
Profit Stop
Use profit stop TradeSim allows an automatic profit stop that is activated once the Exit price reaches the specified percentage profit. Equivalent to the SetProfitStop function.
Ignore profit stop If a profit stop is being used, then check this option to force the profit stop to be ignored within the specified number of bars of entering the trade. Equivalent to the SetProfitStopInactivityDelay function.
Exit at profit stop price Forces all profit stops to exit at the profit threshold rather than the Exit Price. Useful for intraday exits. Equivalent to the SetExitPriceToProfitStop function.
Trade System General Properties
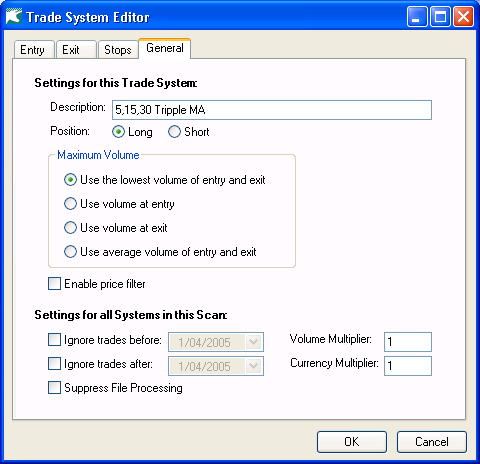
Trade system general properties
The options on this page cause various TradeSim functions to be activated. The functions called are listed so that you can refer to them in the TradeSim manual for more detail.
Settings for this Trade System
Settings in this section apply to the current trade system only. This is also true for the settings on the other three tabs.
DescriptionIf you have multiple systems in your scan it is helpful to give each one a short decription. This will be shown in the Trade Systems tab of the TradeSim scan.
PositionIndicates the type of trade being made. If you’re not sure of the difference then you probably want long, meaning you profit by buying low and selling high.
Maximum volume When TradeSim records a trade, it also includes the volume. This setting controls which volume statistic is recorded. Equivalent to the SetVolumeInfoType function.
Enable price filter Normally if a calculated price (eg entry price) falls outside the range of that day then TradeSim rejects the trade. Ticking this option causes calculated prices to be restricted to their valid range automatically. Equivalent to the EnablePriceFilter function.
Settings for all Systems in this Scan
Settings in this section apply to all systems in this scan. They are grouped here for convenience with the other TradeSim options.
Ignore trades before Ignores any entries that are found before the specified date. Equivalent to the SetStartRecordDate function. Note: You also need to ensure that sufficient data is being load in the Advanced tab of the scan.
Ignore trades after Ignores any entries that are found after the specified date. Equivalent to the SetStopRecordDate function. Note: You also need to ensure that sufficient data is being load on the Trade Systems tab of the scan.
Suppress file processing Prevents the trade system from being added to the tradesim database. Used in diagnosing problems in a trade system. Equivalent to the SuppressFileProcessing function.
Volume multiplier Used to scale volume if you are using a data provider that pre-scales volume. Not required if you are receiving data from BullSystems. Equivalent to the SetVolumeMultiplier function.
Currency multiplier Used to scale prices by a constant value. Equivalent to the SetCurrencyMultiplier function.