Managing Indicators
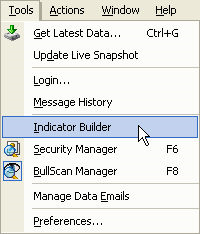
To manage BullCharts indicators, including creating, editing and removing indicators, you need to use the Indicator Builder. You can get to the Indicator Builder by going to the Insert menu (if it is currently visible), choosing Insert Indicator then clicking on the Builder tab, or by going to the Tools menu and choosing Indicator Builder.
The Indicator Builder
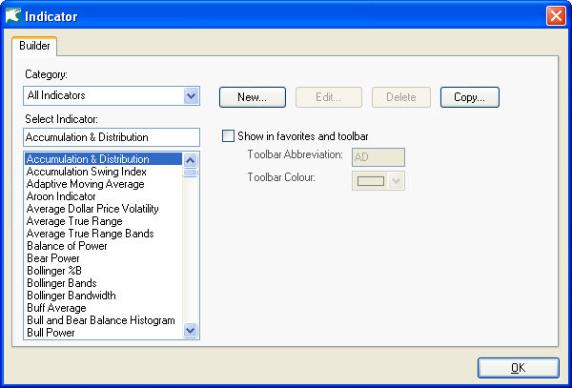
The Indicator Builder has two main parts: the list of indicators on the left, and the action buttons on the right.
The list of indicators on the left functions in exactly the same fashion as in the Insert Indicator dialog.
On the right there are four action buttons.
New creates a new indicator.
Edit allows you to edit an existing indicator.
Delete deletes an existing indicator.
Copy duplicates an existing indicator so that you can customise it.
Note that you cannot edit or delete any of the indicators that come with BullCharts, you can only edit or delete indicators you have created yourself. However, if you select a built-in indicator and click Copy you will create an exact duplicate of that indicator which you can edit.
When you have finished managing indicators, you can click the “Close” button at the bottom of the window to return to BullCharts.
The Script Editor

When you click the New, Edit, or Copy buttons in the Indicator dialog, you will be taken to the Script Editor. The Script Editor is where all BullScript formulae are edited, whether they will be used as indicators or as scans.
-
If you clicked New, the Editor will be empty, except for a new indicator name.
-
If you clicked Copy, the Editor will contain the BullScript for the original indicator, and the indicator name will have a numeric suffix added to distinguish it from the original.
-
If you clicked Edit, the Editor will contain the BullScript and the name of the indicator you are editing.
No indicators will be created or changed until you click the OK button in the editor.
Formula Name
At the top of the Script Editor is the Formula Name field.

If you are creating a new indicator, or copying an existing indicator, this is how you edit its name. If you are editing an existing indicator, altering this field will cause the indicator to be renamed. If you try to use a name already used by another indicator in your copy of BullCharts, you will get an error message when you try to save your changes:
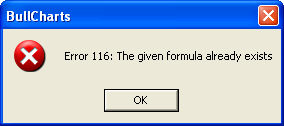
Just change the name of your new indicator and try again.
Formula
Below the Formula Name field is the actual content of the formula, written in BullCharts’ built-in scripting language, BullScript.
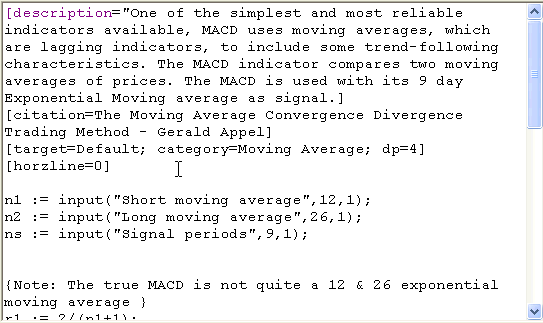
All the standard editing functions are available from the right-click menu. For more information on BullScript and how to create and edit indicators, see the BullScript User’s Guide.
Show Script Helper
At the bottom of the Script Editor, there is a checkbox labelled Show Script Helper.
![]()
Ticking this box expands the Script Editor and reveals the Script Helper, which is a quick reference for the most important features of BullScript. If you untick the box, the Script Editor will shrink back to its previous size.
Script Helper
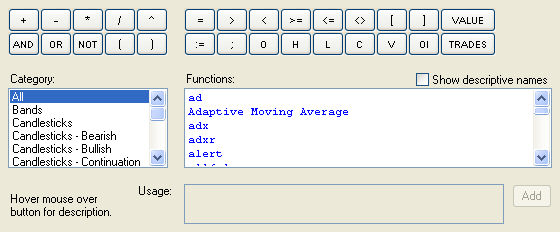
The blocks of buttons directly below the script insert mathematical operators (like multiplication, subtraction, greater than, less than, etc) and basic price functions (like Open, High, Low, Close, Volume etc). Clicking each button inserts the text on the label into the indicator at the current cursor position. For a longer description of each item, hover the mouse over the button for a second and a yellow tool-tip should appear.
Below the blocks of buttons are two lists which allow you to browse the available indicators, in case you want to include them in your own indicator. The list on the left shows all the categories of indicators that have been defined. Choosing any category displays all that category’s indicators in the list on the right.
The list on the right contains the names of indicators in the selected category. Clicking on an indicator in the list displays a sample of how to use that indicator in BullScript, below. When an indicator is selected, you can click the “Add” button to insert it into the script at the cursor position.
Above the list on the right is a small box labelled “Show descriptive names”. If this is ticked, then the indicators in the list will be listed by their longer, more descriptive names. If the box is not ticked, indicators will be listed by their short names, which are easier to work with in BullScript. If an indicator has no short name, its long name will be used instead. The usage sample and the code inserted by the “Add” button will always use the short name, if any.